Diffused Posterization
Adding Noise to Posterization of 0-1 (Unity/HLSL)

In this tutorial we will look at posterization and a simple technique to add diffused noise to the effect.
The tutorial for this shader is going to be divided into 5 sections:
- Posterization
- Line Function
- Adding Noise to Line Function
- Colour Correction
- Application
Posterization
The Posterization effect leverages the step function to sub-divide each whole-number interval of a linear function into k parts.
float posterize(float v, float k) {
return ceil(v*k)/k;
}
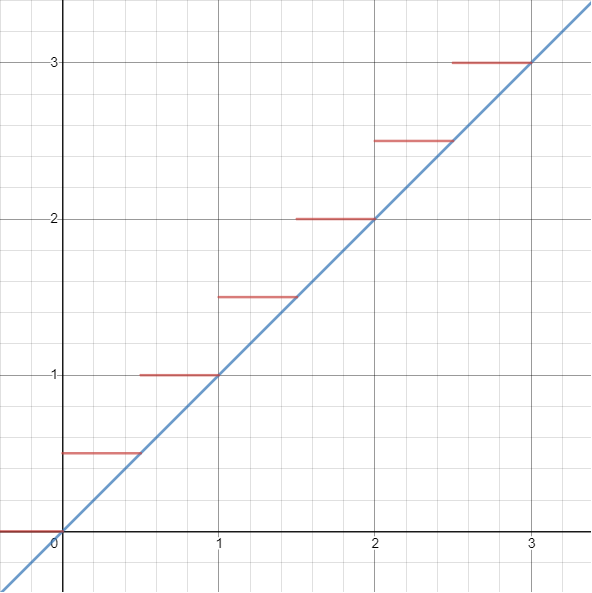
k=2, blue is linear increase, red is step increase
As we can see above, as x increases linearly, y increases in increments of 1/k everytime x crosses the 1/k threshold on its own axis.
When applied to a uv-texture, the step function looks like this:
void surf (Input IN, inout SurfaceOutputCustom o) {
o.Normal = UnpackNormal(tex2D(_NormalTex, IN.uv_NormalTex));
o.Albedo = post;
o.Alpha = 1.0;
}

k=7
As we have seen before, a uv-texture ranges from 0 to 1 on each axis. In the code above, we have sub-divided the y-axis into 7 parts. This has the effect of giving us 7 distinct bands of colour that are all still in the range of 0 to 1.
Line Function
Next, we would like to draw lines at the edge of each colour band like so:

Let's start by drawing a single red line.

A single line drawn at 0.5, width 0.1
void surf (Input IN, inout SurfaceOutputCustom o) {
fixed post = posterize(IN.uv_MainTex.y, _K);
o.Normal = UnpackNormal(tex2D(_NormalTex, IN.uv_NormalTex));
o.Alpha = c.a;
}
The above code checks whether the current value of the y-axis is less than 0.5 while also checking if it is less than 0.4. If the value is in the sweet spot where it is less than 0.5 but greater than 0.4, it assigns a value of 1 to the variable bar.
It then uses bar to blend with the posterized colour and red.
Now that we can draw a single line of a certain width anywhere on the uv-texture, we use the same technique to draw a line of width 0.1 at our posterized values on the y-axis:
void surf (Input IN, inout SurfaceOutputCustom o) {
fixed post = posterize(IN.uv_MainTex.y, _K);
fixed4 c = (1-bar) * post + bar * float4(1,0,0,1);
o.Normal = UnpackNormal(tex2D(_NormalTex, IN.uv_NormalTex));
o.Albedo = c.rgb;
o.Alpha = c.a;
}
Success!
Adding Noise to Line Function
With the basics of posterization and posterized line drawing under our belt, we can move on to doing neat things with it. In the previous section we fixed our line widths to 0.1. In this section we will vary the line widths by a random variable.

Perlin Noise Texture
void surf (Input IN, inout SurfaceOutputCustom o) {
fixed post = posterize(IN.uv_MainTex.y, _K);
fixed4 c = (1-bar) * post + bar * float4(1,0,0,1);
o.Normal = UnpackNormal(tex2D(_NormalTex, IN.uv_NormalTex));
o.Albedo = c.rgb;
o.Alpha = c.a;
}
In the code above, we sample the Noise Texture which gives us a value between 0 and 1. We use this value to vary our line width. We also divide the noise by _K to scale the noise down such that if we have more colour bands due to our posterize function, the less we expand the width of each line due to noise.

k=3
Finally, to make the effect more interesting, we offset the noise texture coordinates by time.
void surf (Input IN, inout SurfaceOutputCustom o) {
fixed post = posterize(IN.uv_MainTex.y, _K);
fixed bar = step(IN.uv_MainTex.y, post) - step(IN.uv_MainTex.y, post-noise/_K);
fixed4 c = (1-bar) * post + bar * float4(1,0,0,1);
o.Normal = UnpackNormal(tex2D(_NormalTex, IN.uv_NormalTex));
o.Albedo = c.rgb;
o.Alpha = c.a;
}

Colour Correction
Next, we want to replace the red colour with one that is appropriate to make it look like one band of colour from each posterization level is diffusing into the one below.
void surf (Input IN, inout SurfaceOutputCustom o) {
fixed post = posterize(IN.uv_MainTex.y, _K);
float2 textureCoordinate = IN.uv_NoiseTex + float2(_Time.y/10, _Time.y/20);
fixed noise = tex2D(_NoiseTex, textureCoordinate);
fixed bar = step(IN.uv_MainTex.y, post) - step(IN.uv_MainTex.y, post-noise/_K);
o.Normal = UnpackNormal(tex2D(_NormalTex, IN.uv_NormalTex));
o.Albedo = c.rgb;
o.Alpha = c.a;
}
We initialize a variable invK which is essentially the gap between each colour band. If k=2, the interval 0 to 1 is divided into 2 equal intervals, and so 1/2 is the difference between each colour band.
Each noisy, red line diffuses into a preceeding colour band, and we want to assign it the colour of the next colour band. We do this by adding invK (the gap value) to the current post value.

k=3
Application
Diffused Posterization is a pretty reusable image effect since it works on any range from 0 to 1; although this is pretty much the end of this tutorial we will continue to build the advertised effect.
We start by showing what posterization looks like on diffused lighting: diff (NDotL)
half4 LightingCustom (SurfaceOutputCustom s, half3 lightDir, half3 viewDir) {
float diff = max(0, dot(s.Normal, lightDir));
fixed post = posterize(diff, _K);
half4 col;
col = post;
col.a = s.Alpha;
return col;
}

We then proceed to take the posterization effect out of the surf function so that we can move it into our lighting function. Instead we assign the actual colour of the texture assigned to the Albedo.
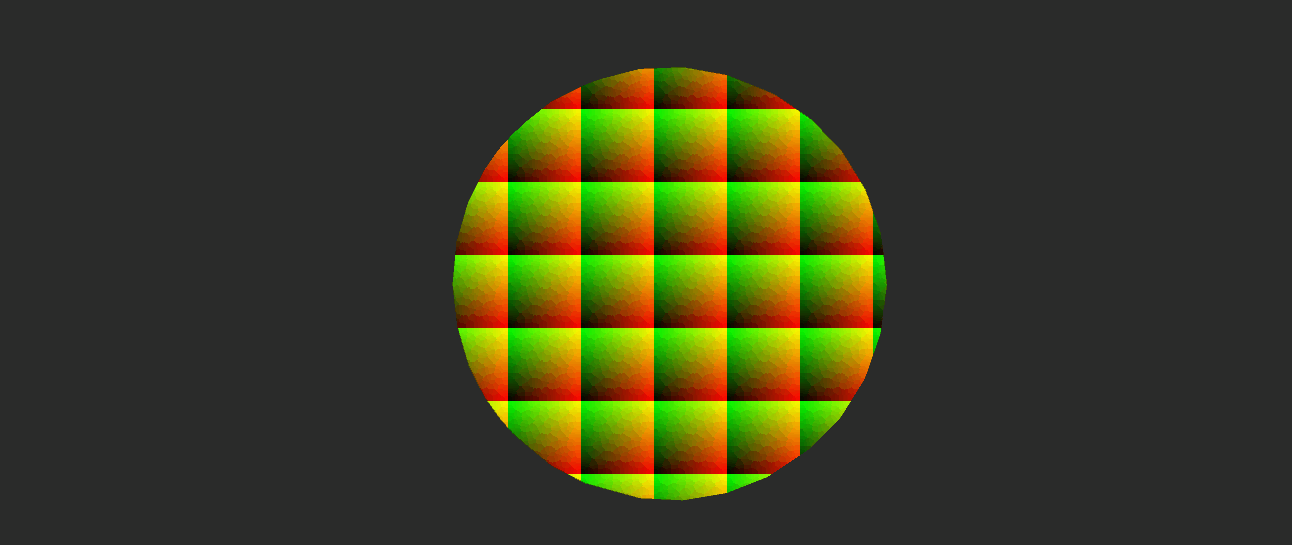
We also setup a patterned, screenspace texture as we have seen in the previous tutorial, but this time we use it to sample and pass noise to the lighting function.
void surf (Input IN, inout SurfaceOutputCustom o) {
o.Normal = UnpackNormal(tex2D(_NormalTex, IN.uv_NormalTex));
o.Albedo = c.rgb;
o.Alpha = c.a;
}
The screen space uv-textures that are used to sample noise look like this (code not shown):
We continue to diffuse the posterized lighting:
half4 LightingCustom (SurfaceOutputCustom s, half3 lightDir, half3 viewDir) {
float diff = max(0, dot(s.Normal, lightDir));
fixed post = posterize(diff, _K);
half4 col;
col.a = s.Alpha;
return col;
}

Perlin Noise

Worley Noise
The full shader and sample scene can be found in this repository. Thanks for tuning in, until next time!